

We're going to walk through how to make our Neorepo magic link email:
Making great emails is one of the worst parts of building your own product.
You need to:
style your emails with HTML and CSS and without the help of modern tools (e.g. Tailwind)
manage different platforms (e.g. mobile vs web)
manage different clients (e.g. Gmail vs Apple Mail)
often leverage 3rd party email builders that are out of sync with your code
Not anymore! Enter React Email.
React Email is a set of components using React and Typescript built for creating and sending custom emails. It lets you build great-looking and easily customized emails without the overhead of importing generated HTML or relying on 3rd party email builders.
React Email is from the makers of Resend, a company making it easier to send emails at scale (another painful part of shipping great apps).
In this tutorial, we're going to make a new Next.js app, install React Email, and send out an email with an email provider of your choice.
Set up Next.js
Let's start by creating a new Next.js app using the Next.js CLI
npx create-next-app next-email-app --tsThe latest version of the Next.js CLI will ask you some setup questions. You can choose your personal preference, but for the sake of the tutorial, we'll use all the defaults (press
return)✔ Would you like to use ESLint with this project? … Yes ✔ Would you like to use `src/` directory with this project? … No ? Would you like to use experimental `app/` directory with this project? › No ✔ What import alias would you like configured? … @/*Change directories to your new app
cd next-email-app
Set up React Email
Install React Email dependencies
npm install react-emailIf this installs a canary build and you're having issues, install the latest 1.7 version
Install React Email components
npm install react-email @react-email/button @react-email/html -E
Create your first email
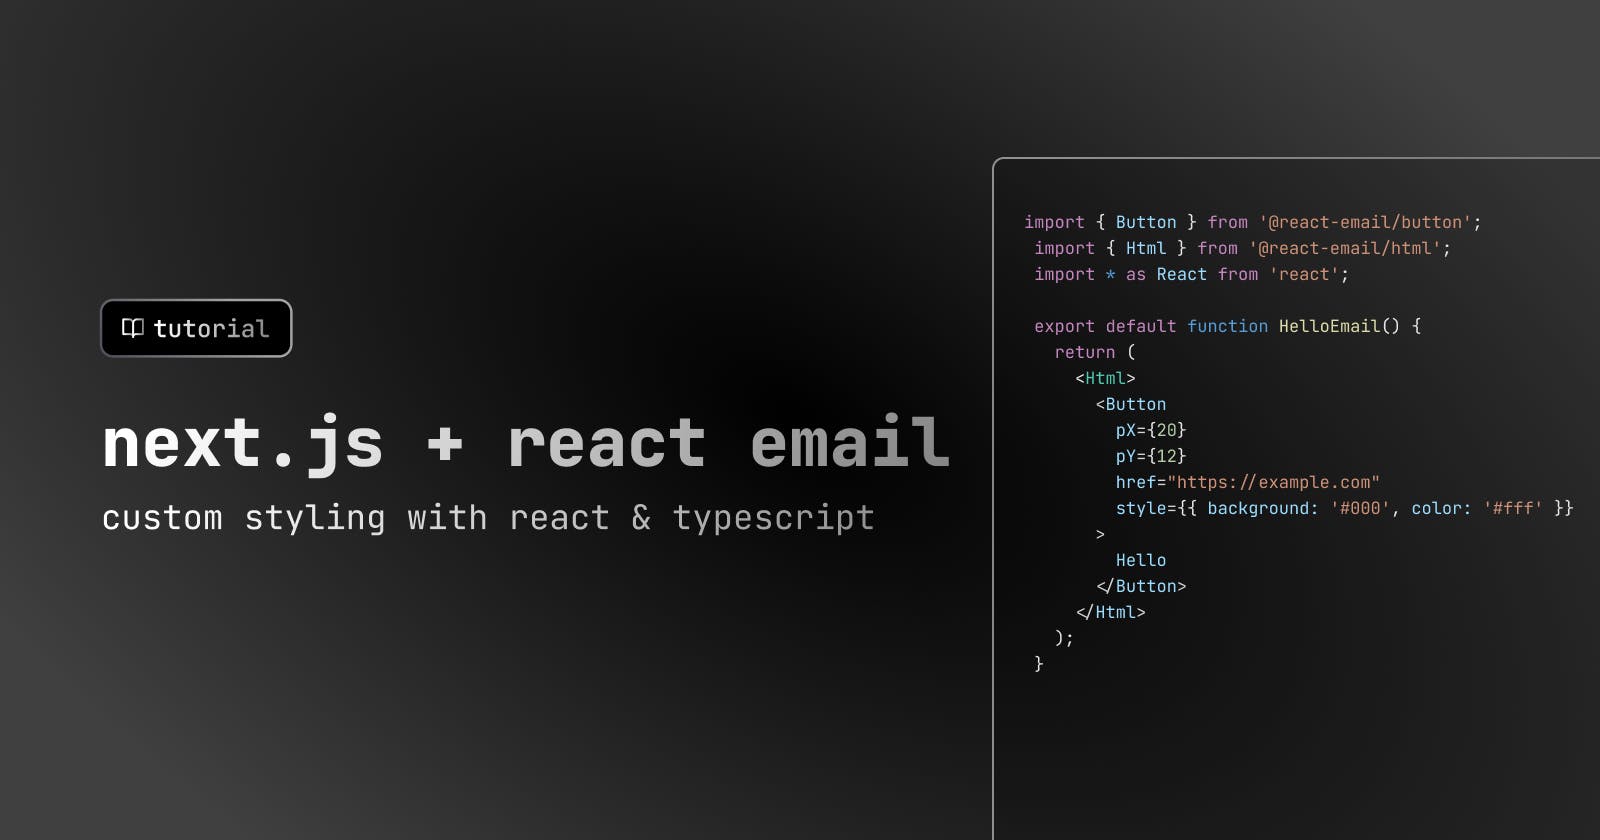
Create a new folder called
emailsAdd
HelloEmail.tsximport { Button } from '@react-email/button'; import { Html } from '@react-email/html'; import * as React from 'react'; export default function HelloEmail() { return ( <Html> <Button pX={20} pY={12} href="https://example.com" style={{ background: '#000', color: '#fff' }} > Hello </Button> </Html> ); }
View emails live
Add the following script to your
package.jsonto allow you to see the React Email page for reviewing your emails live.{ "scripts": { "email": "email dev" } }Check out your email with generated previews by running the following:
npm run email
Implement a nice email design
We're now going to implement our Neorepo magic link email!
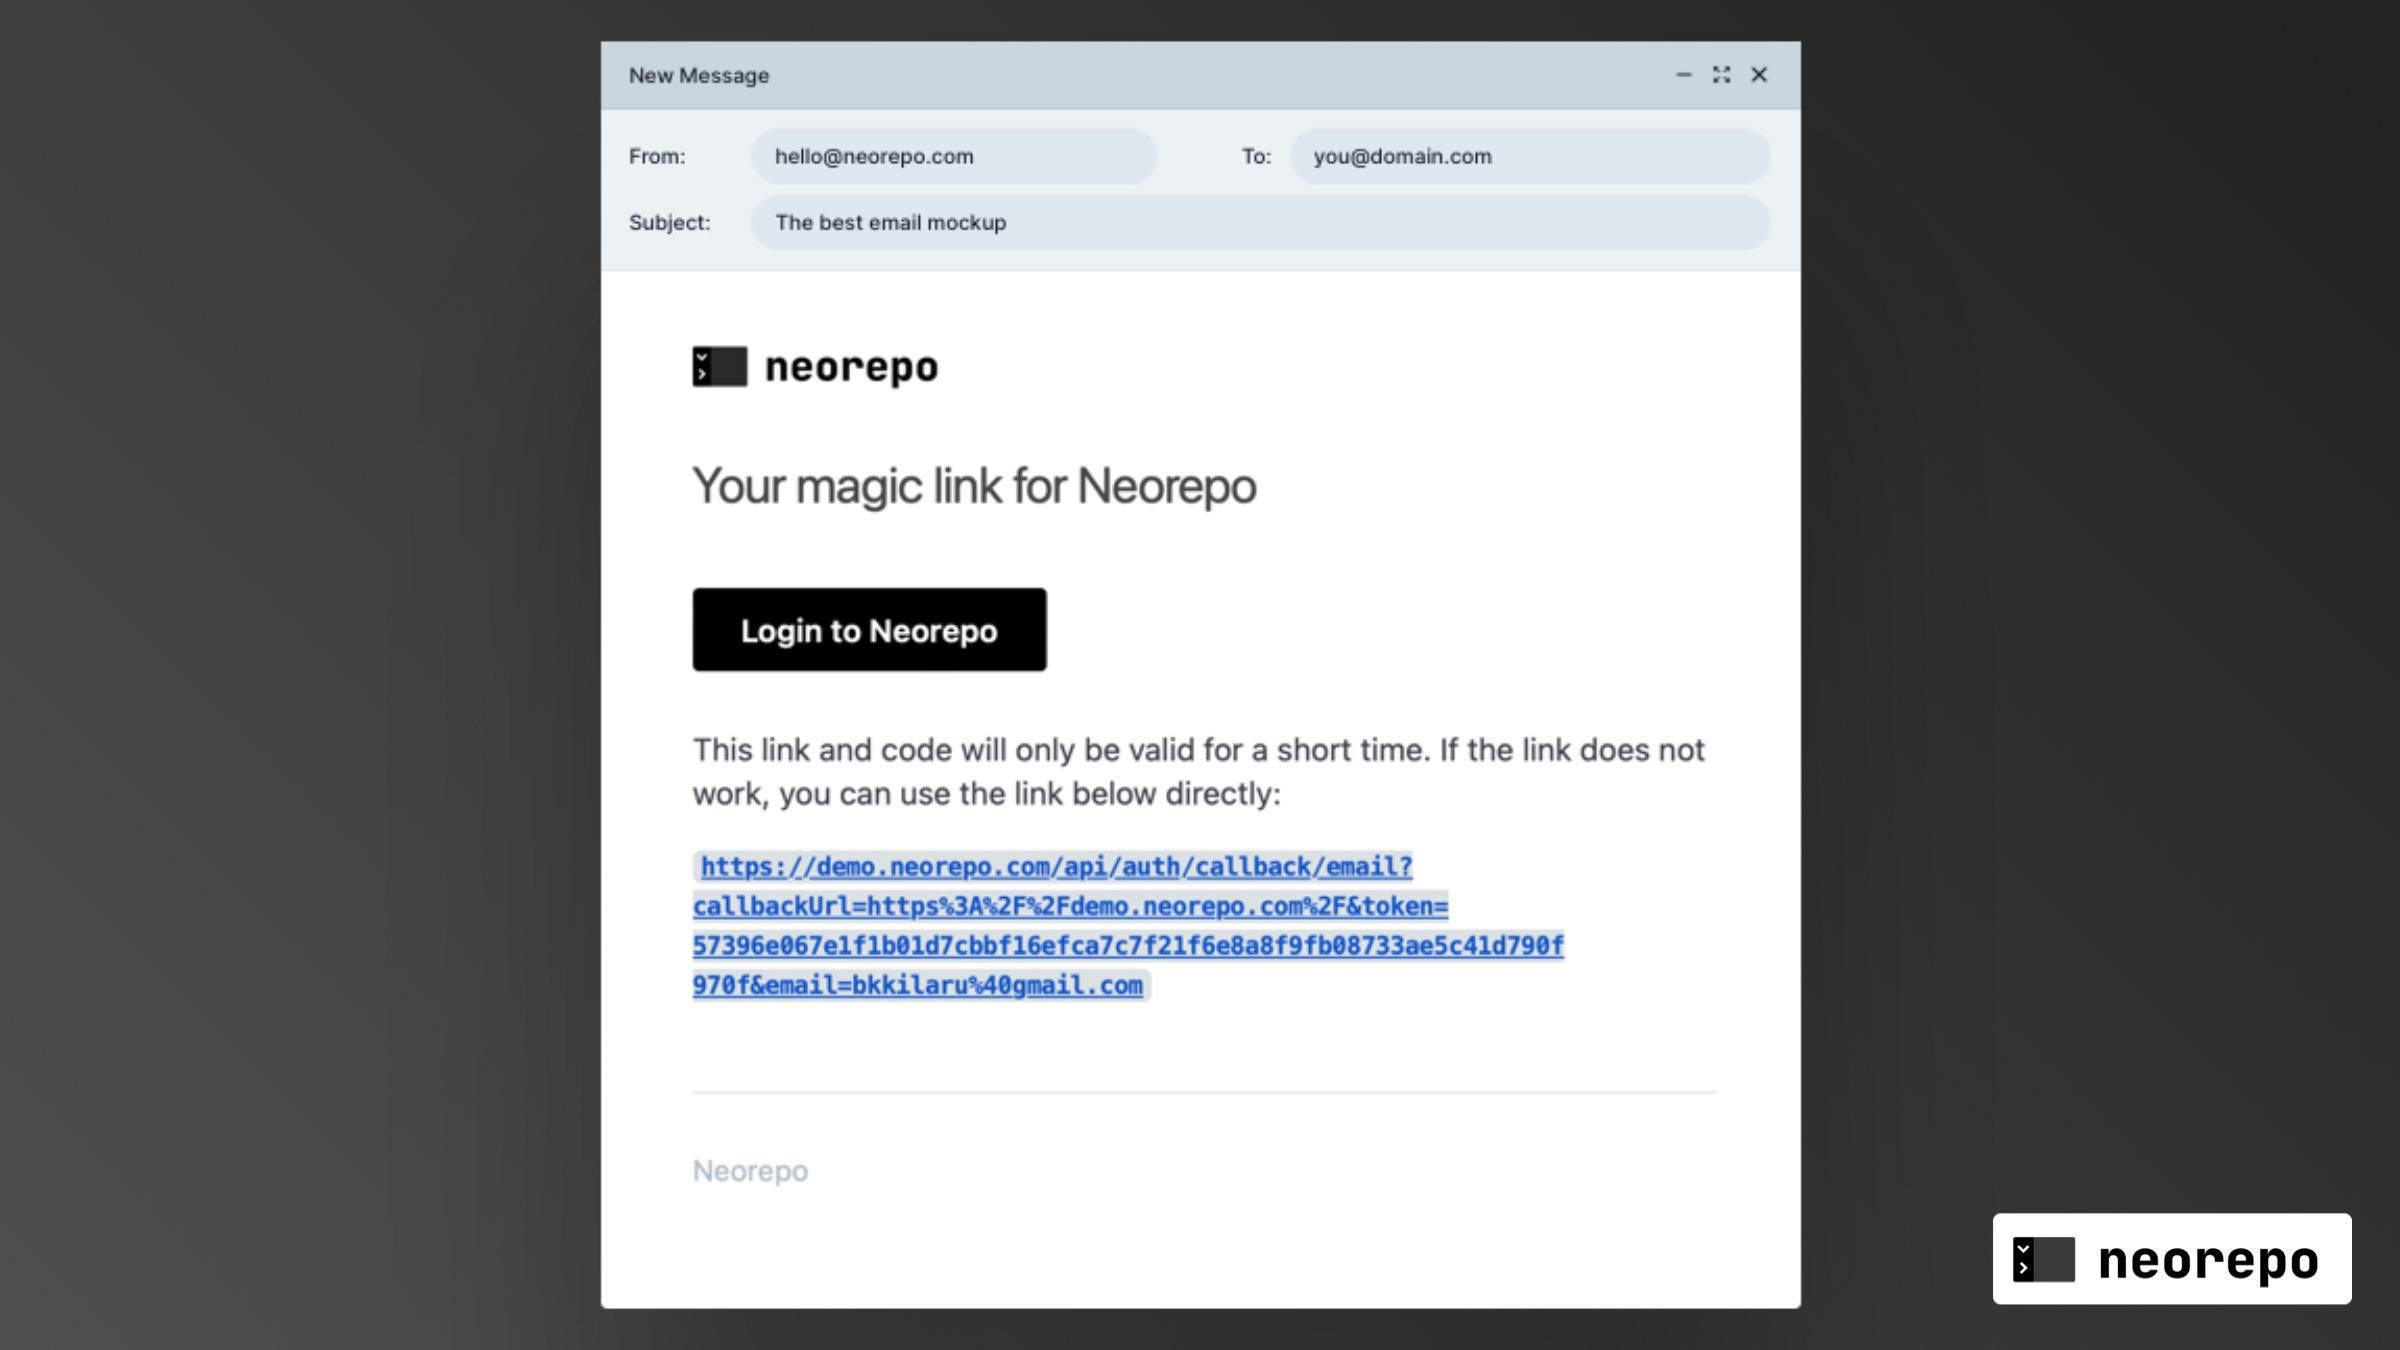
Use the following InviteUserEmail.tsx component
You'll need to install a few more @react-email packages to get the full effect
import { Button } from "@react-email/button";
import { Container } from "@react-email/container";
import { Head } from "@react-email/head";
import { Html } from "@react-email/html";
import { Preview } from "@react-email/preview";
import { Section } from "@react-email/section";
import { Text } from "@react-email/text";

type InviteUserEmailProps = {
  url: string;
  host: string;
};

export default function InviteUserEmail({
  url = "https://neorepo.com",
  host = "neorepo.com",
}: InviteUserEmailProps) {
  const escapedHost = host.replace(/\./g, "​.");

  return (
    <Html>
      <Head />
      <Preview>{`Sign in to ${escapedHost}`}</Preview>
      <Section style={main}>
        <Container style={container}>
          <Text style={h1}>Sign in to {escapedHost}</Text>
          <Section style={{ textAlign: "center" }}>
            <Button pX={20} pY={12} style={btn} href={url}>
              Sign in
            </Button>
            <Text style={text}>
              If you did not request this email, you can safely ignore it
            </Text>
          </Section>
        </Container>
      </Section>
    </Html>
  );
}

const main = {
  backgroundColor: "#ffffff",
  margin: "0 auto",
};

const container = {
  border: "1px solid #eaeaea",
  borderRadius: "5px",
  margin: "40px auto",
  padding: "20px",
  width: "465px",
};

const h1 = {
  color: "#000",
  fontFamily:
    "-apple-system, BlinkMacSystemFont, 'Segoe UI', 'Roboto', 'Oxygen', 'Ubuntu', 'Cantarell', 'Fira Sans', 'Droid Sans', 'Helvetica Neue', sans-serif",
  fontSize: "24px",
  fontWeight: "normal",
  textAlign: "center" as const,
  margin: "30px 0",
  padding: "0",
};

const text = {
  color: "#000",
  fontFamily:
    "-apple-system, BlinkMacSystemFont, 'Segoe UI', 'Roboto', 'Oxygen', 'Ubuntu', 'Cantarell', 'Fira Sans', 'Droid Sans', 'Helvetica Neue', sans-serif",
  fontSize: "14px",
  lineHeight: "24px",
};

const btn = {
  backgroundColor: "#000",
  borderRadius: "5px",
  color: "#fff",
  fontFamily:
    "-apple-system, BlinkMacSystemFont, 'Segoe UI', 'Roboto', 'Oxygen', 'Ubuntu', 'Cantarell', 'Fira Sans', 'Droid Sans', 'Helvetica Neue', sans-serif",
  fontSize: "12px",
  fontWeight: 500,
  lineHeight: "50px",
  textDecoration: "none",
  textAlign: "center" as const,
};
Send your email
Install Nodemailer - a module for Node.js apps to easily send out emails
npm install nodemailerLet's add types for nodemailer
npm i --save-dev @types/nodemailerCreate an
.envfile with your SMTP credentials. This should be available from your email provider.Note: You need to get your own SMTP credentials to send out your email. In the example below, I use Sendgrid, but a good free option is Mailgun!
 SMTP_PASSWORD=
 SMTP_FROM=
 SMTP_HOST=
 SMTP_PORT=
 SMTP_USER=
Let's create a
libfolder and addemail-helper.tswhere we'll set up our SMTP config and send emails out via Nodemailerimport nodemailer from "nodemailer" type Payload = { recipient: string, subject: string, html: string, } const smtpSettings = { host: process.env.SMTP_HOST, port: parseInt(process.env.SMTP_PORT), auth: { user: process.env.SMTP_USER, pass: process.env.SMTP_PASSWORD, }, } export const handleEmailFire = async (data: Payload) => { const transporter = nodemailer.createTransport({ ...smtpConfig, }) return await transporter.sendMail({ from: process.env.SMTP_FROM, ...data, }) }Add a file in your API folder at
pages/api/send-email.tsimport type { NextApiRequest, NextApiResponse } from "next" import HelloEmail from "../../emails/HelloEmail" import { render } from "@react-email/render" import { handleEmailFire } from "../../lib/email-helper" export default async function handler( req: NextApiRequest, res: NextApiResponse ) { await sendEmail({ to: "hello@neorepo.com", subject: "Hello", html: render(HelloEmail()), }) return res.status(200).json({ message: "Success" }) }Add a button click to fire off your email
```typescript import { useState } from "react";
const Home = () => {
function handleSubmit(e) { e.preventDefault(); const postData = async () => { const data = { title: title, post: post, };
const response = await fetch("/api/send-email", { method: "POST",
}); return response.json(); }; postData().then((data) => { alert(data.message); }); }
return (
export default Home; ```
Overall
Now you can easily configure and style your own emails with React Email. Have a good template you designed? Share it here!